

Fixing a Broken Gold Necklace: DIY vs Professional Repair Costs
Fixing a Gold Necklace: What You Can Do Yourself
Fixing a gold necklace starts with finding the break. If a jump ring has opened, you can gently twist it sideways with two jewelry pliers, reconnect the chain or clasp, and close it tightly. If a link has snapped, the chain is kinked, or the metal needs soldering, stop pulling on it and have a jeweler assess it. Heat can damage delicate, hollow, or gold-plated chains.
A simple clasp or jump-ring fix may need only basic tools. Soldering takes more skill and can cost more, but it may be the safer choice for a valuable necklace. I’m Morris Mervis, and I’ll walk you through the repair options and costs.
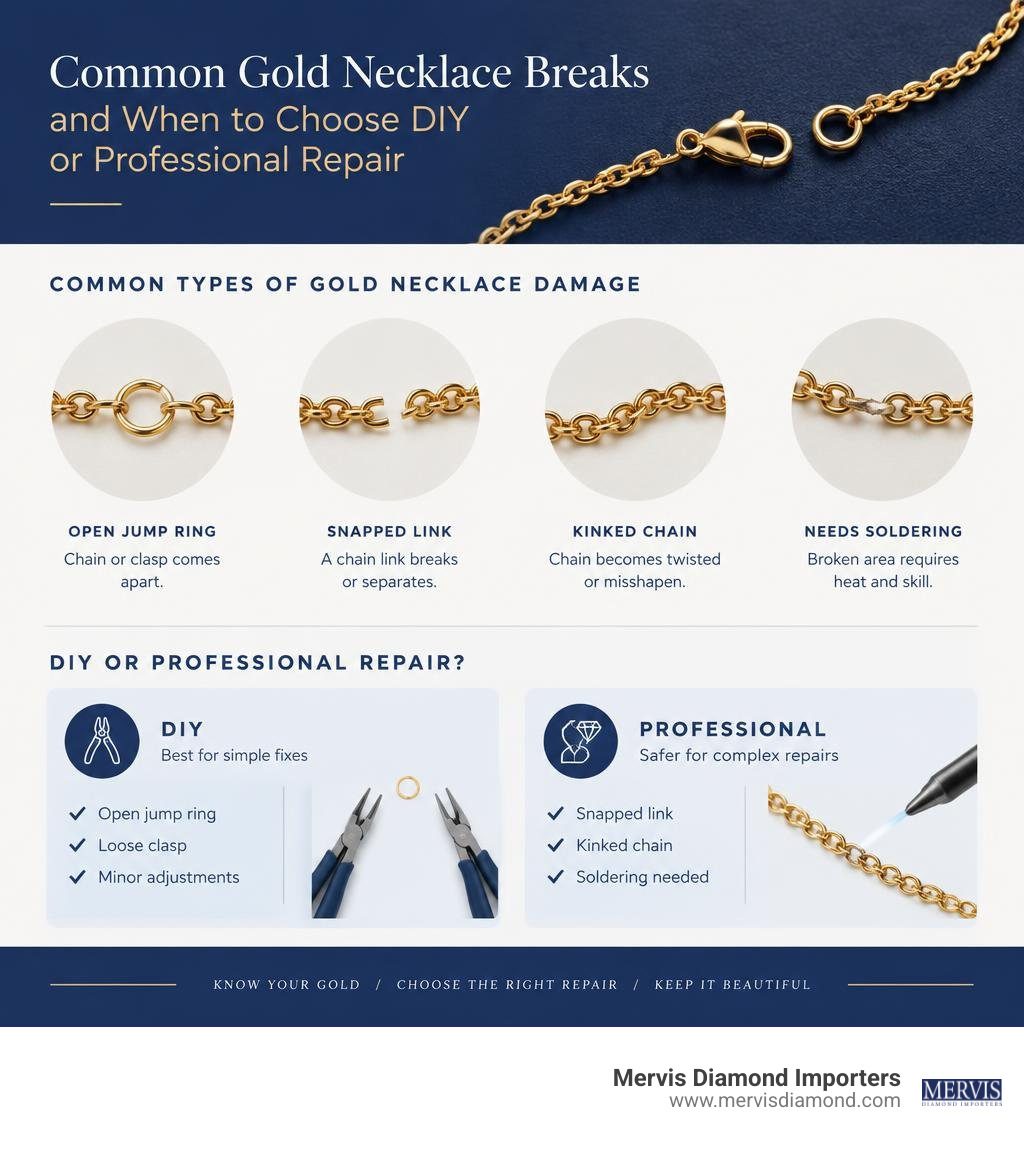
Identifying Common Types of Gold Necklace Damage
Before attempting any repair, it is essential to diagnose the exact nature of the damage and understand the physical characteristics of your chain. Gold is prized for its warm luster and resistance to tarnish, but pure gold is remarkably soft. To make it wearable, jewelers alloy it with metals like copper, silver, and zinc.
Understanding your gold's karat purity gives immediate insight into its durability:
- 10K Gold: Contains 41.7% pure gold. Highly durable and scratch-resistant, but harder to bend or shape without precision tools.
- 14K Gold: Contains 58.3% pure gold. The industry standard balancing rich color with practical tensile strength.
- 18K Gold: Contains 75% pure gold. Softer, heavier, and more prone to stretching or nicking under strain.
- 24K Gold: Pure gold. Extremely malleable and easily deformed by everyday snags.
Beyond purity, construction matters. Solid gold links handle stress and heat well, whereas hollow gold chains feature paper-thin walls engineered around an empty core. Hollow designs dent, collapse, or melt under direct torch flame. Similarly, gold-plated and gold-filled chains carry only a thin surface layer of gold over brass or steel; applying heat or aggressive tools will scorch or strip the exterior finish.
Snapped Links and Stretched Chains
The most common culprit behind a broken necklace is mechanical link fatigue. Every time a necklace catches on a sweater, gets tugged by a child, or bears the weight of a heavy pendant, the individual links experience micro-strains.
Different chain styles fail in distinctive ways:
- Cable and Curb Chains: Simple interlocking oval or round loops. When strained, individual links pull oblong and open at their original seam.
- Rope Chains: Multiple tiny links woven together to mimic twisted hemp. When one internal link snaps, the surrounding structure begins to unravel, causing the weave to fray.
- Box Chains: Geometric, four-sided square links. Excessive tension crushes or separates the delicate folded walls, creating sharp, jagged edges.
- Snake and Herringbone Chains: Tightly fitted metal plates or bands. Bending these past their natural radius crushes the internal core, leaving permanent kinks or snapped hinge joints that cannot be realigned manually.
Broken Clasps, Loose Jump Rings, and Fallen Pendants
Not every break happens along the body of the chain. Closures and connection points bear constant friction and movement:
- Spring Ring Clasps: House an internal steel spring that retracts a tiny gold bolt. Over time, skin oils, soap residue, and metal fatigue weaken the spring, causing the clasp to stick open or lose tension entirely.
- Lobster Claw Clasps: Offer greater mechanical strength, but their tiny interior lever can snap or seize if pulled forcefully.
- Open Jump Rings: The un-soldered circular loops connecting clasps to chains frequently pull apart under moderate pressure.
- Worn Pendant Bails: The hanging loop (bail) of a pendant rubs against chain links as you move. Over years of wear, this friction cuts thin grooves into the metal until the bail wears through, causing the pendant to slip off unnoticed.
Severe Knots and Chain Kinks
Thin gold chains seem to attract tangles out of thin air. When delicate links rub together inside a jewelry box or pocket, microscopic friction locks them into tight knots. Pulling on the ends only tightens the tangle, turning flexible links into sharp micro-kinks that weaken the gold.
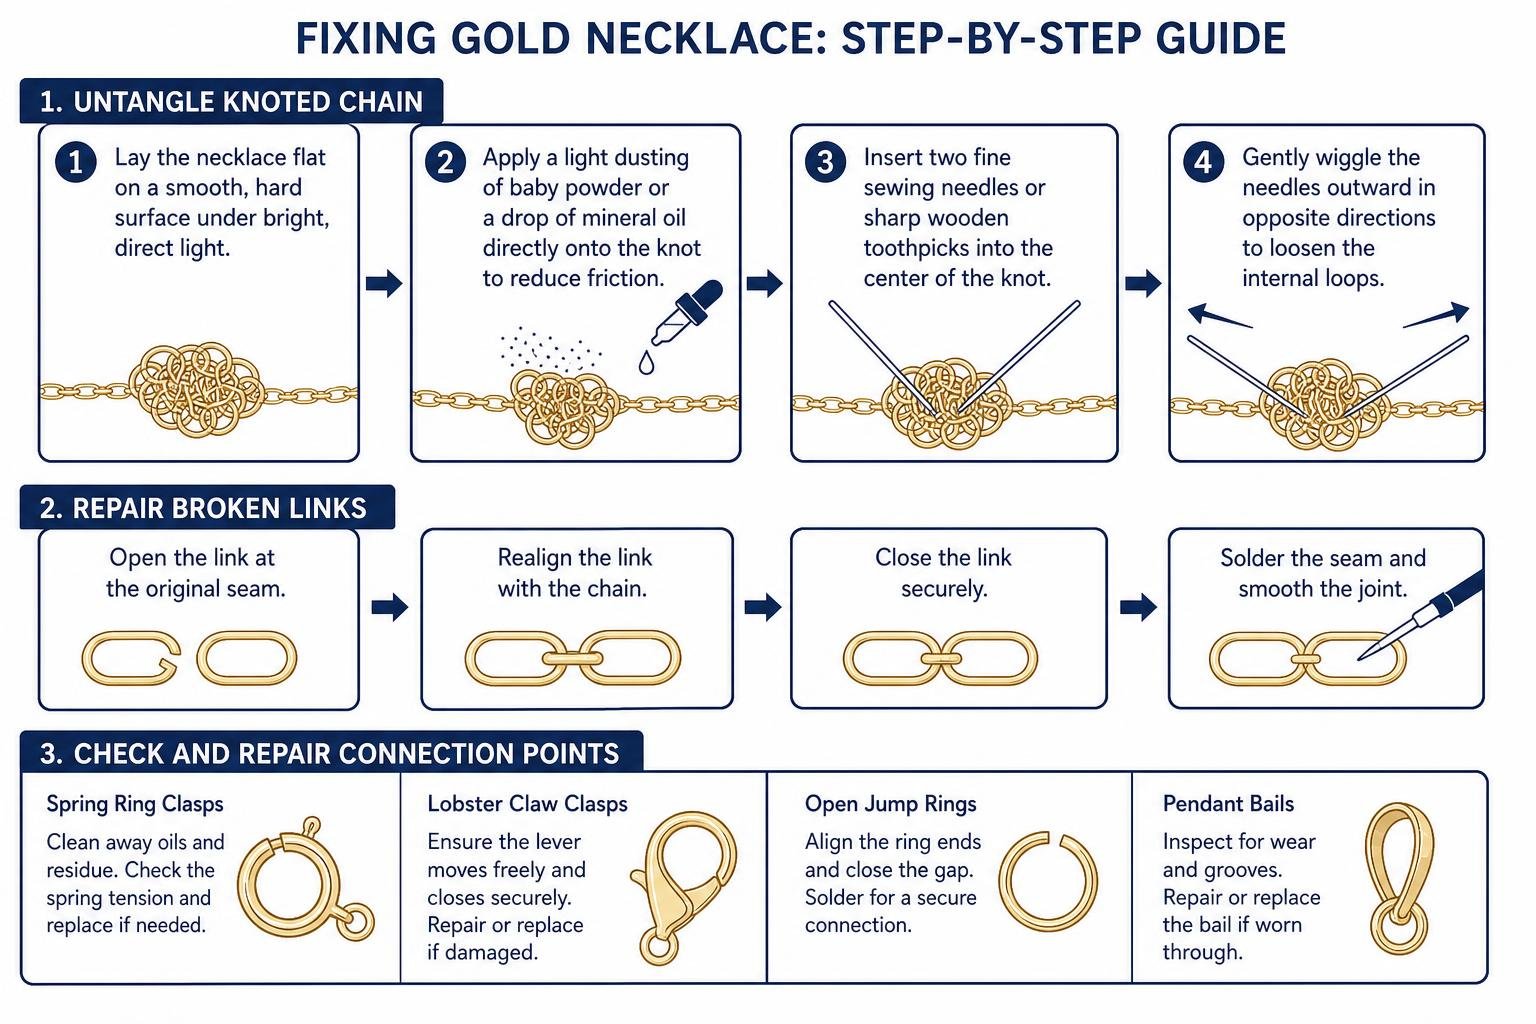
To safely untangle a stubborn knot without breaking the links:
- Lay the necklace flat on a smooth, hard surface under bright, direct light.
- Apply a light dusting of baby powder or a drop of mineral oil directly onto the knot to reduce surface friction between the links.
- Insert two fine sewing needles or sharp wooden toothpicks into the center of the knot.
- Gently wiggle the needles outward in opposite directions to loosen the internal loops.
- Once the knot opens up, work the chain free link by link, then wash the chain in warm soapy water to remove all powder or oil residue.
DIY Guide: Fixing Gold Necklace Chains, Clasps, and Links
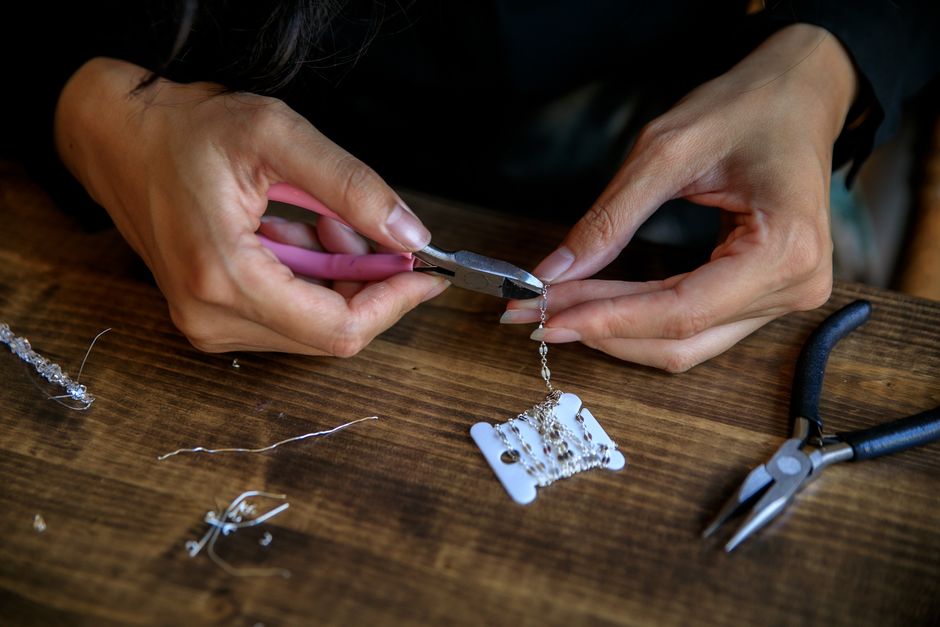
Handling a minor chain repair at home is manageable when you have the correct hand tools, adequate lighting, and a steady workspace. Reviewing quick jewelry repair tips for 2026 can help you prepare your workstation safely and avoid common beginner missteps.
Essential Tools for Fixing a Gold Necklace at Home
Never attempt to fix delicate jewelry using household hardware pliers. Their serrated steel jaws will crush, gouge, and strip gold surfaces instantly. Instead, assemble a dedicated jewelry kit:
- Smooth-Jaw Chain-Nose Pliers: Featuring flat, smooth inner faces that grip jump rings and links securely without scratching.
- Round-Nose Pliers: Ideal for shaping circular wire loops and rounding out deformed links.
- Bent-Nose Tweezers: Allow for steady placement of minuscule components under magnification.
- Jump Ring Opener Tool: A grooved metal ring worn on the finger to provide steady counter-leverage.
- Magnifying Loupe or Desk Magnifier: Essential for inspecting link alignment and finding microscopic stress fractures.
- Assorted Gold Jump Rings & Replacement Clasps: Available in various gauges and karat-matching finishes.
Step-by-Step Instructions for Fixing Gold Necklace Links and Chains
When fixing gold necklace chains with open or separated links, preserving the circular shape of the link is your top priority.
- Secure Your Workspace: Work over a high-contrast, padded felt or silicone bead mat. If a microscopic link drops, it will stay put rather than bouncing onto the floor.
- Inspect the Link: Use your loupe to examine the broken link. Identify the natural opening seam.
- Grip with Dual Pliers: Grasp the left side of the link with your chain-nose pliers and the right side with a second pair of pliers or tweezers.
- Execute a Lateral Twist: Never pull the link apart horizontally (like opening a wishbone), as this causes metal fatigue and weakens the gold. Instead, gently twist one side forward and the other side backward.
- Thread the Connecting Links: Slide the open link through the neighboring chain links to re-establish the connection.
- Close with Lateral Pressure: Twist the two ends back toward each other until they meet flush. Apply slight inward pressure so the ends click into perfect alignment with no visible gap.
- Perform a Tension Check: Gently tug the chain with your fingers to ensure the seam remains closed and the link moves freely within the chain sequence.
Replacing a Faulty Clasp or Reattaching a Pendant
A failing clasp is one of the easiest home repairs you can make:
- Remove the Old Clasp: Locate the jump ring connecting the clasp body to the chain terminal. Grip the ring and twist it open laterally. Slide off the worn spring ring or lobster claw.
- Attach the Replacement: Slide your new, functioning clasp onto the open jump ring. For everyday durability, opt for a solid lobster clasp over a delicate spring ring.
- Re-close the Connector: Twist the jump ring back into alignment until the seam sits tight against itself.
- Inspect the Pendant Bail: If a pendant has slipped off because its bail widened, carefully thread the chain back through, then use smooth nylon-jaw or smooth chain-nose pliers to gently press the bail opening closed.
Soldering a Gold Chain: Safety and Solder Techniques
For permanent link fusion that won't pull open under everyday tension, metal-to-metal soldering is required. Soldering joins two pieces of metal by melting a specialized filler alloy (solder) into the joint.
- Clean the Metal: Clean the chain ends thoroughly using warm water and mild detergent. Solder will not flow across oxidized, oily, or dirty metal.
- Apply Antiflux: Paint liquid antiflux (such as yellow ochre) onto the neighboring links to prevent solder from accidentally flowing into them and locking the chain stiff.
- Apply Flux and Solder: Place the broken link in firm contact on your soldering block. Brush liquid jewelry flux across the seam, then place a micro-pallion (a tiny clipping) of karat-matched gold solder directly over the break. Using solder that matches your chain's karat (e.g., 14K easy solder for a 14K chain) ensures a seamless color match.
- Apply Controlled Torch Heat: Using a fine micro-torch tip, heat the entire link evenly. Solder naturally flows toward the hottest point. The moment the solder flashes and flows into the joint, remove the flame immediately.
- Quench, Pickle, and Neutralize: Quench the chain in water, submerge it in a warm pickle solution to remove surface fire-scale, rinse, and buff the joint smooth with a jewelry polishing cloth.
DIY vs. Professional Gold Necklace Repair: Methods and Costs
While simple jump ring closures are straightforward at home, professional jewelry repair utilizes advanced bench techniques that preserve the structural integrity and aesthetic value of fine jewelry. Exploring options for fast jewelry repair near me can help you weigh speed against equipment capability.
| Feature / Factor | DIY Home Repair | Professional Bench Jeweler |
|---|---|---|
| Typical Cost | $5 – $25 (Tools/Findings) | $25 – $50+ per break |
| Tools Required | Pliers, tweezers, replacement rings | Laser welder, micro-torch, microscopes |
| Joint Strength | Moderate (mechanical closure) | Permanent (molecular/solder fusion) |
| Risk of Discoloration | None (mechanical) / High (home torch) | None (precise laser/torch matching) |
| Applicable Chain Types | Sturdy cable, curb, open jump rings | All styles (including hollow, rope, snake) |
| Turnaround Time | Immediate (10–15 minutes) | Same-day to 7–10 business days |
When to Choose DIY vs. a Professional Jeweler
Certain repairs should always be handed to a master jeweler:
- Heirloom or High-Value Pieces: Sentimental or high-karat vintage necklaces are irreplaceable; an accidental torch slip or deep tool scratch can diminish their beauty and value.
- Hollow Gold Chains: Because the walls are micro-thin, standard home torches will instantly melt and collapse the surrounding structure. Jewelers repair these using high-precision laser welders that direct concentrated energy onto the seam without heating adjacent hollow walls.
- Intricate Chain Weaves: Complex rope, wheat, and Franco patterns require microscopic re-weaving and pinpoint laser micro-welds to maintain fluid movement.
- Chains with Bezel-Set Gemstones or Pearls: Heat from home torches travels rapidly along gold links, which can fracture emeralds, scorch diamonds, or burn organic pearls.
If you are dealing with a complex break, knowing how to choose a shop for fixing jewelry near me ensures your piece is evaluated by an experienced professional.
Professional Repair Pricing and Turnaround Times
Professional chain repair is surprisingly accessible and cost-effective:
- Standard Torch Soldering: Typically costs between $25 and $40 per broken link. The jeweler matches the gold alloy, solders the seam, removes oxidation, and polishes the chain factory-fresh.
- Laser Welding: Ranges from $40 to $75 per joint. It is ideal for heat-sensitive metals, hollow chains, and ultra-fine links because the localized light beam prevents heat spread.
- Clasp Replacement: Replacing a worn clasp with a solid 14K gold lobster clasp typically ranges from $35 to $90, depending on the gold weight and clasp dimensions.
- Turnaround Expectations: Standard mail-in or bench repairs average 7 to 10 business days. Many local fine jewelry boutiques also provide on-the-spot assessments or express same-day services for straightforward breaks.
When Full Chain Replacement Is Recommended
There comes a point when repairing an aging chain is no longer practical. If a necklace has stretched significantly, individual links have worn thin from decades of friction, or the chain breaks repeatedly in new spots every time it is worn, the structural integrity of the gold has been compromised. Repeated soldering makes an old chain brittle and stiff. In these scenarios, reviewing chain replacement necklace options is the safest way to protect your cherished pendants from being lost.
How to Maintain and Prevent Future Gold Necklace Breaks

A few proactive care habits can drastically reduce the risk of unexpected chain breaks:
- Store Flat or Suspended: Always hang gold necklaces individually on jewelry hooks or lay them flat in velvet-lined compartments. Storing multiple chains together in a single pouch creates friction knots that weaken delicate links.
- Fasten the Clasp Before Storing: Always close the clasp when taking off your necklace. An open clasp easily snags surrounding links and forms stubborn tangles.
- Follow the "Last On, First Off" Rule: Put your gold necklace on after applying perfumes, lotions, and hairsprays, and after pulling garments over your head. Take it off first before changing out of evening wear.
- Remove Before Sleep and Workouts: Tossing and turning on bedsheets twists chains into tight binds, while gym movements catch links on athletic fabrics or weights.
- Match Pendant Weight to Chain Gauge: Never hang a heavy, solid-gold medallion or large diamond cluster on an ultra-thin whisper chain. The sustained downward pull will stretch oval links into stressed, brittle lines.
- Schedule Regular Inspections: Bring your daily-wear chains in for professional jewelry repairs and routine inspections every 6 to 12 months. A jeweler can catch thinning jump rings, loose bails, and worn clasp springs before they fail. Pair these visits with our jewelry cleaning ultimate guide 2026 to keep your gold sparkling safely year-round.
Frequently Asked Questions About Gold Necklace Repair
Can you fix a broken gold chain without soldering?
Yes. If the break is located at the connector, you can attach an open jump ring using smooth-jaw pliers to rejoin the chain ends or add a new clasp. However, if an internal link within the weave has snapped, mechanical pinching is only a temporary fix. For full tensile strength and seamless flexibility, the link must be professionally soldered or laser-welded.
How much does a professional jeweler charge to solder a gold necklace?
A basic gold chain solder or laser repair typically starts between $25 and $50 for a single break. If the chain requires multiple solder joints, clasp replacement, or specialized laser welding on a hollow structure, the price will scale based on labor and any added gold weight.
Can hollow gold chains be repaired at home?
We strongly advise against repairing hollow gold chains at home with heat or standard tools. Hollow links have micro-thin walls that easily crush under mechanical pliers and melt instantly beneath a DIY soldering flame. A professional jeweler must repair hollow gold using specialized laser welding equipment that pinpoints energy without collapsing the internal cavity.
Conclusion
A broken gold necklace does not have to mean retiring a beloved piece of jewelry. Minor jump-ring adjustments and clasp replacements are easy to tackle at home with smooth-jaw pliers and a steady hand. However, when it comes to snapped links, fragile hollow gold, or intricate weaves, professional soldering and laser welding deliver lasting strength while preserving your necklace's original beauty.
At Mervis Diamond Importers, we believe fine jewelry should be worn and cherished every day. Whether you need a trusted link repair, a clasp upgrade, or a thorough inspection of your diamond settings, our master jewelers in Tysons, VA, Rockville, MD, and Washington, DC provide pressure-free guidance and dedicated care. Explore our comprehensive guide to caring for fine jewelry and diamond pieces or stop by one of our showrooms today to keep your treasured gold pieces shining bright for generations.