

Mastering Bead Bracelet Repair: Cord Types and Knots That Last
How to Repair a Broken Bead Bracelet
To repair a broken bead bracelet, save the beads and photograph their order before removing the old cord. Check for sharp bead holes or a failed clasp. Then restring the beads on new elastic, thread, or beading wire that fits their holes. For a stretch bracelet, gently pre-stretch the elastic, tie a secure surgeon's knot, and test the fit before wearing it.
The key is to fix why the bracelet broke, not just where it broke. A fresh cord can fail again if a rough bead keeps rubbing against it. I'm Morris Mervis, and I'll show you how to choose the right materials and make a repair that holds.
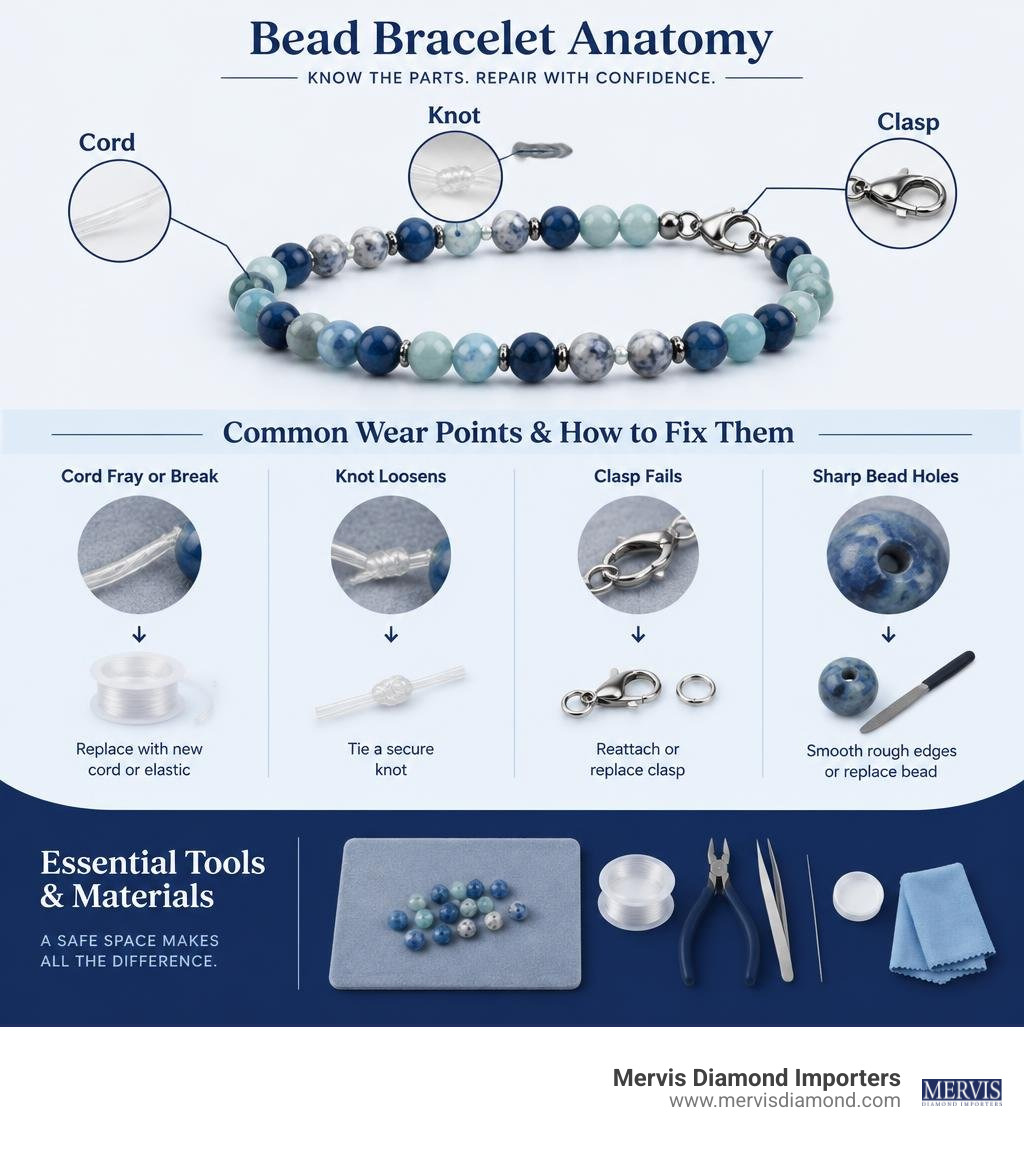
Essential Tools and Materials for Bead Bracelet Repair
Embarking on a successful repair starts with setting up a dedicated workspace. Working over bare hardwood or tile is an invitation for loose gemstones to roll away into oblivion. Using a soft flock-lined bead mat or a plush microfiber towel keeps your components contained and cushions delicate stones from chipping.
Before stringing a single bead, gather these essential implements:
- Fine-tip flush cutters or beading scissors: Standard household scissors create frayed, crushed ends on synthetic fibers. Flush cutters deliver clean, perpendicular cuts that pass effortlessly through narrow drills.
- Collapsible eye needle: These flexible wire needles compress to fit through tiny drill holes and snap back open for effortless threading.
- Bead reamer or diamond-tipped needle file: A manual reamer smooths out sharp burrs, jagged edges, and internal grit inside drilled stones that act like microscopic saws against your cord.
- Measuring tape or beading board: Essential for establishing precise wrist circumference and calculating necessary ease.
Managing stringing tension is just as critical as choosing quality tools. Think of your bracelet like a miniature suspension bridge: if the tension is pulled too tight, the cord becomes rigid, transferring stress straight into the knot. If it is too loose, visible gaps appear between the stones, leaving the inner core exposed to friction and dirt.
| Cord Type & Diameter | Tensile & Stretch Durability | Ideal Bead Hole Size & Compatibility | Best Application |
|---|---|---|---|
| 0.5 mm Elastic | Light resistance; low bulk | 0.6 mm – 0.8 mm (seed beads, small pearls) | Lightweight spacers, delicate mineral beads |
| 0.8 mm Elastic | High elasticity (>5,000 cycles) | 0.9 mm – 1.2 mm (standard 6 mm–8 mm beads) | All-purpose stretch bracelets, standard gemstones |
| 1.0 mm – 1.2 mm Elastic | Heavy tensile resistance | 1.2 mm+ (chunky 10 mm+ stones, lava rock) | Heavy gemstone beads, large statement bracelets |
| 0.015 in – 0.018 in Wire | Rigid, multi-strand flexible core | Standard drill holes with crimp beads | Clasp bracelets, high-value gemstones, glass |
Choosing the Right Cord for Your Beads
The foundation of any durable restringing project is matching the cord material to the physical properties of your beads. A standard 0.8 mm elastic cord is the gold standard for stretch designs; laboratory testing demonstrates that quality 0.8 mm polyurethane elastic can withstand over 5,000 stretch cycles without structural fraying or permanent deformation.
For bracelets featuring precious gemstones, jagged crystals, or hefty glass elements, standard elastic may yield over time under continuous weight. In these scenarios, switching to multi-strand nylon-coated stainless steel beading wire (typically 19-strand or 49-strand) provides superior cut-resistance against abrasive stone drillings. Alternatively, tightly braided, bonded nylon thread offers high tensile strength and drape for knotted designs, though it requires finishing with clasps rather than stretch knots.
Specialized Adhesives and Hardware Tools
A common DIY misconception is that dousing a knot in household superglue makes it indestructible. In reality, standard cyanoacrylates dry into a brittle, glass-like crust. When your bracelet flexes, that rigid adhesive creates a sharp stress point that shears the elastic fibers.
Instead, professional jewelers rely on flexible adhesives such as GS Hypo Cement or specialized beading adhesives that dry pliable and absorb kinetic shocks. When working with non-elastic beading wire, adhesives are replaced entirely by mechanical hardware: seamless metal crimp tubes and specialized two-stage crimping pliers. These tools fold and compress metal around the wire without biting into or weakening the inner stainless core.
Step-by-Step Guide to Restringing and Knotting Elastic Bracelets
Performing a dependable elastic bead bracelet repair at home takes only 15 to 30 minutes once you master the mechanical sequence. Always diagnose the root cause of the initial break first: check if the previous elastic decayed from chemical exposure, if a knot slipped due to poor tying technique, or if rough drill edges sliced the line. You can explore our foundational insights on quick jewelry repair tips 2026 to familiarize yourself with preventive jewelry care before beginning your restringing.
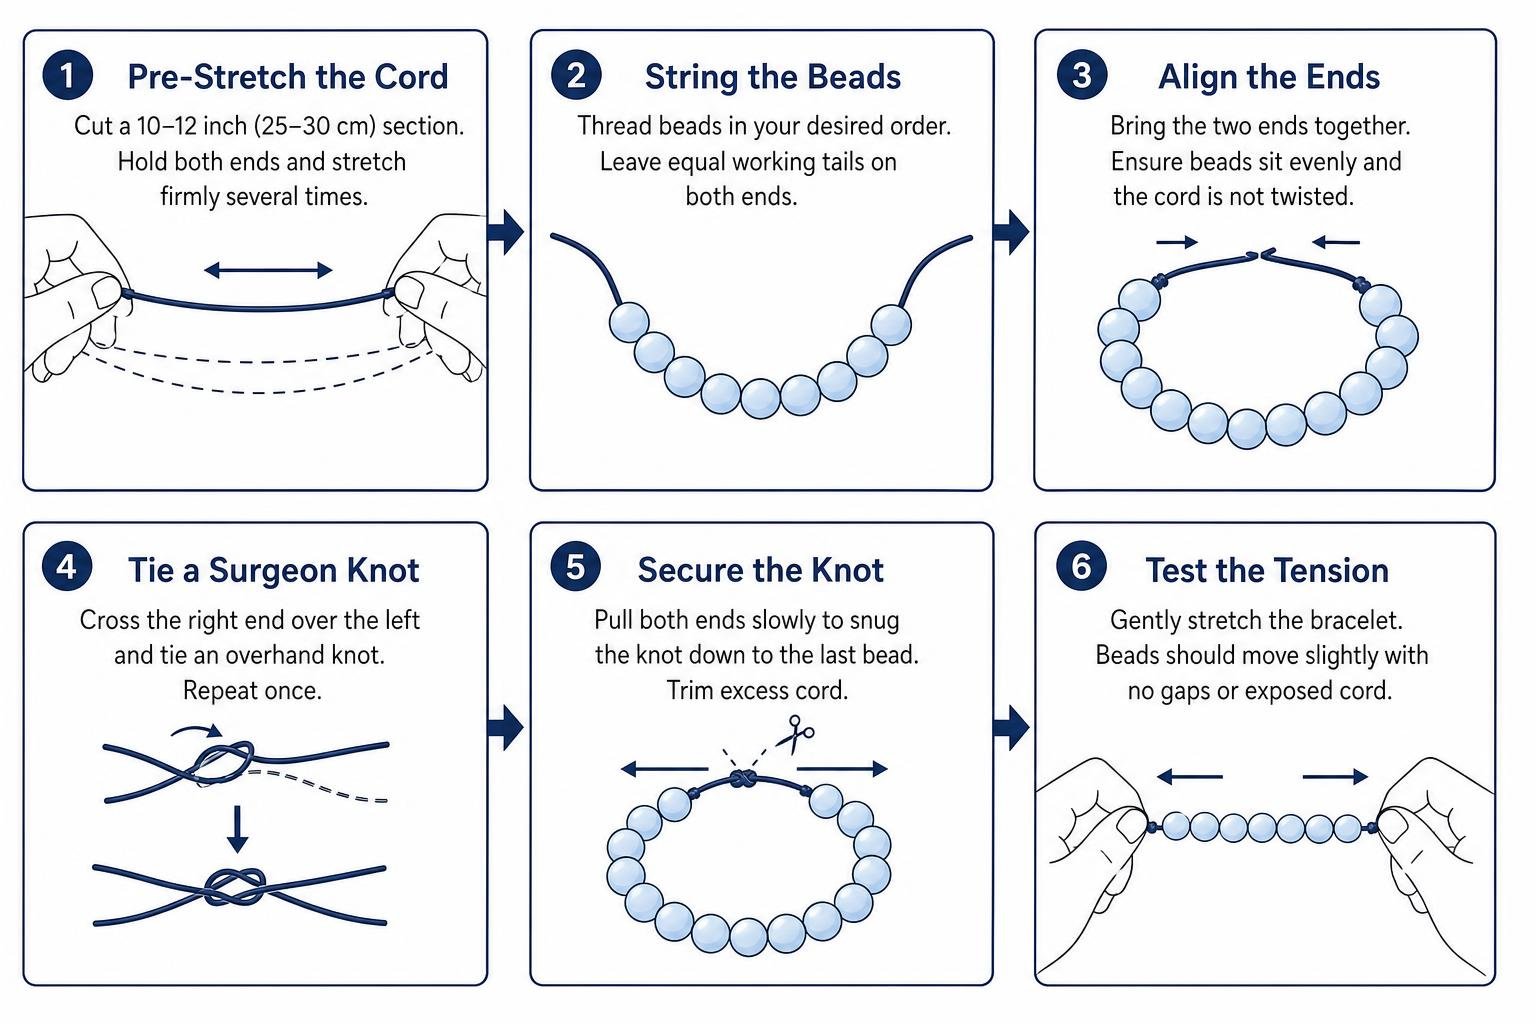
Step 1: Pre-Stretching and Bead Sequencing
Never restring beads onto unstretched elastic right off the spool. Untreated elastic harbors manufacturing slack that causes a newly repaired bracelet to sag and develop unsightly gaps within its first week of wear.
- Measure and Cut: Cut a 10 to 12-inch section of your chosen elastic cord (typically 0.8 mm). This gives you generous working tails on either side.
- Pre-Stretch: Hold the cord between your fingers and pull firmly 4 to 5 times along its length. You will feel the material yield slightly and settle into its true resting elasticity.
- Arrange the Sequence: Lay your beads out on your mat. Identify one bead with a slightly larger drill hole—this will serve as your "anchor bead" where you will conceal the finished knot.
- Stringing: Thread your beads using your collapsible needle. To determine proper length, measure your wrist snug against the skin and add 0.5 to 0.75 inches (1.2 to 1.9 cm) of ease for standard 6 mm to 8 mm beads, ensuring the final loop rests comfortably without biting into your skin.

Step 2: The Double and Triple Surgeon's Knot Technique
Standard single overhand knots are notorious for slipping under elastic tension because smooth synthetic cords provide minimal surface friction. To lock your bracelet permanently, utilize a double or triple surgeon's knot, which wraps the working ends multiple times through the loop to generate dual friction points.
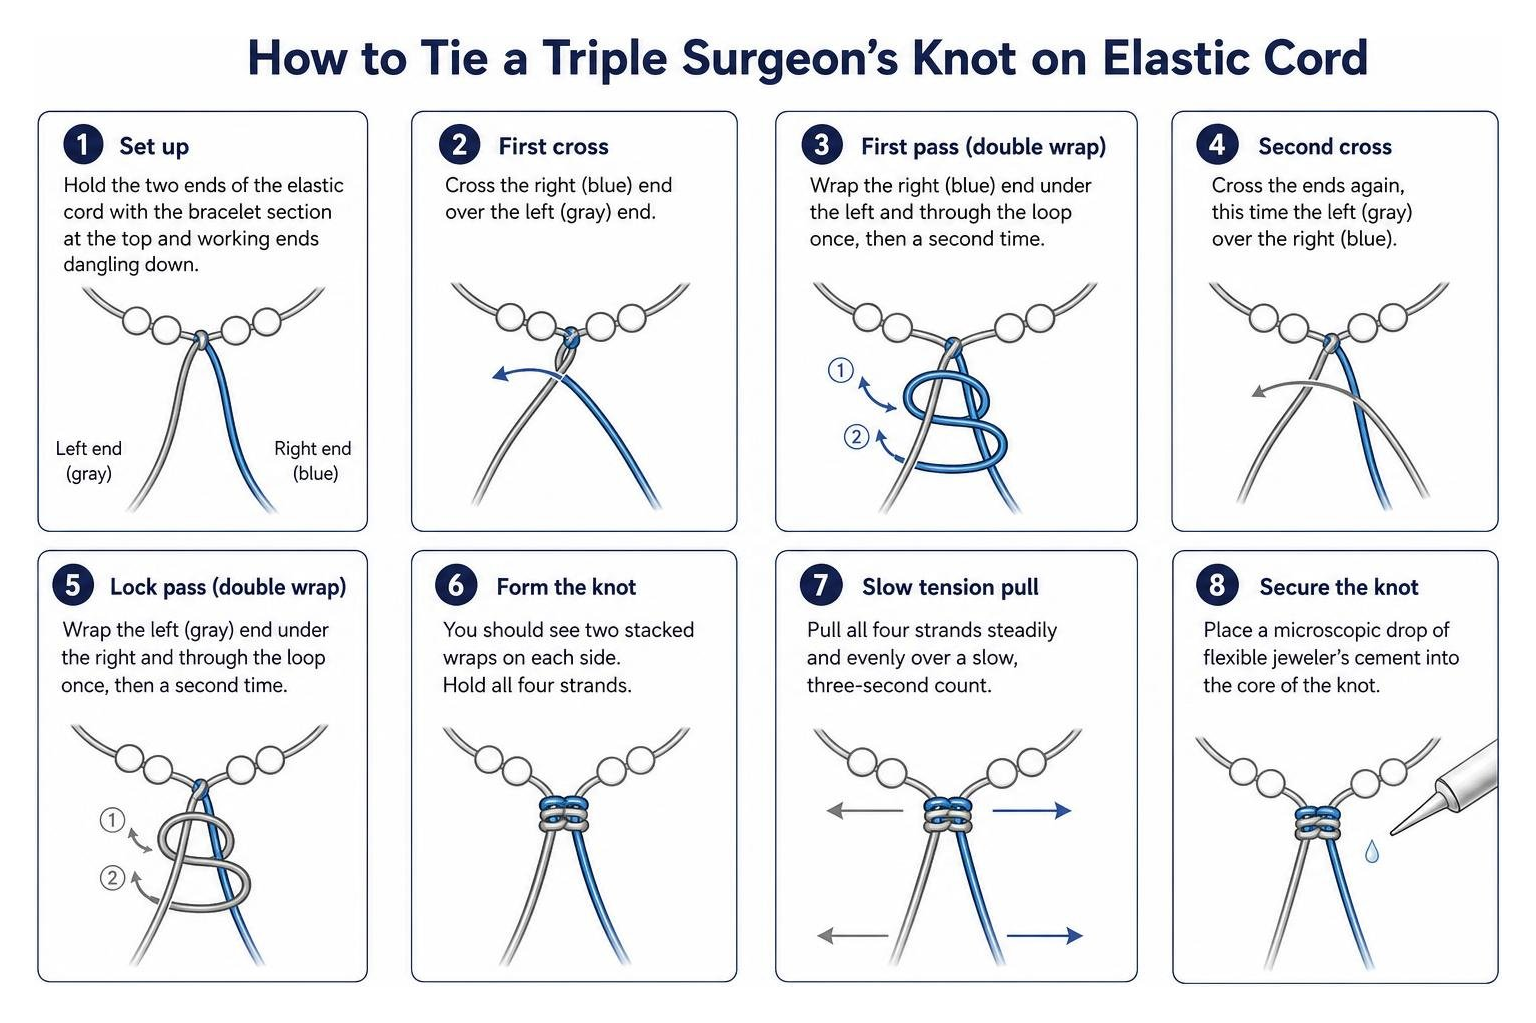
- First Pass: Cross the right cord over the left and wrap it under once, then wrap it under a second time through the same loop (forming a double pass).
- The Lock Pass: Cross the cords again (left over right) and wrap the tail through twice more.
- Slow Tension Pull: Do not jerk the ends quickly. Pull all four strands (both working tails and both bracelet sides) steadily and evenly over a slow, three-second count. Pulling slowly dissipates heat from friction that would otherwise weaken the internal elastic fibers.
- Adhesive Application: Place a microscopic drop of flexible jeweler's cement directly into the core of the knot. Allow the adhesive to wick between the fibers without saturating the adjacent beads.
Step 3: Hiding the Knot and Tension Testing
A visible knot looks untidy and remains exposed to exterior abrasion. Immediately after applying adhesive, gently draw the knot inside the cavity of your designated anchor bead while the cement is still tacky.
Allow the adhesive to cure completely for 12 to 24 hours before wearing the bracelet. Once fully cured, trim the cord tails to approximately 2 mm to 3 mm so they stay tucked neatly inside the anchor bead. Finally, perform a tension test: stretch the bracelet gently to roughly 1.5 times your wrist circumference. If the knot shifts or reveals cord slippage, re-tie it immediately; if the knot holds rock-solid and springs back to shape, your repair is complete.
Advanced Fixes: Clasp Replacement, Wire Restringing, and Resizing
Not all beaded bracelets are built on elastic. Fine gemstone strands, heritage pearls, and intricate designer pieces often utilize braided steel beading wire terminated with lobster clasps, toggle closures, or magnetic locks. When a wire snaps or a closure mechanism fails, following a methodical beaded bracelet clasp replacement guide ensures your piece retains both security and structural balance.
Replacing Broken Clasps and Crimp Beads
When restringing on flexible wire, mechanical crimp tubes create the load-bearing connection at both ends of the bracelet.
- Thread Hardware: Slide a crimp tube followed by a wire guardian (a small horseshoe-shaped metal finding that protects wire from clasp friction) onto your wire.
- Attach Closure: Loop the wire through your replacement lobster clasp or jump ring, then feed the wire back down through the opposite side of the wire guardian and back through the crimp tube.
- Crimp Securely: Position the crimp tube roughly 1 mm to 2 mm from the clasp to maintain fluid movement. Use the back notch of your crimping pliers to fold the tube into a distinct U-shape, then use the front notch to fold the two halves together into a smooth, rounded cylinder.
- Trim and Conceal: Slide the first 2 to 3 adjacent beads over the excess tail wire before flush-cutting the remaining end. If dealing with other damaged hardware across your collection, such as a broken earring post, you can see how specific metal components require dedicated mechanical or soldering solutions.
Resizing and Replacing Damaged or Missing Beads
When a bracelet snaps while you're out and about, beads frequently scatter across the floor, leaving you short on components when you rebuild. Alternatively, you may have inherited an ill-fitting vintage piece that rolls awkwardly on your arm.
- Downsizing: Simply remove an equal number of beads from both sides of the focal centerpiece to maintain symmetrical balance.
- Upsizing or Missing Beads: If original matching gemstones are lost, introduce complementary metal spacer beads (such as sterling silver, 14k gold-filled rondelles, or hematite spacers) symmetrically around the perimeter.
- Inspecting Damaged Minerals: Check remaining beads under bright light for hairline fractures. Just as fine diamonds can suffer physical impact—as explained in our guide detailing whether a diamond can chip or break—semi-precious minerals like amethyst, moonstone, and tourmaline can develop internal cleavages that will crack under pressure if restrung.
DIY vs. Professional Restringing: Costs and Maintenance
While tackling a simple single-strand stretch repair is an empowering weekend DIY project, intricate constructions warrant the steady hand of a master bench jeweler.
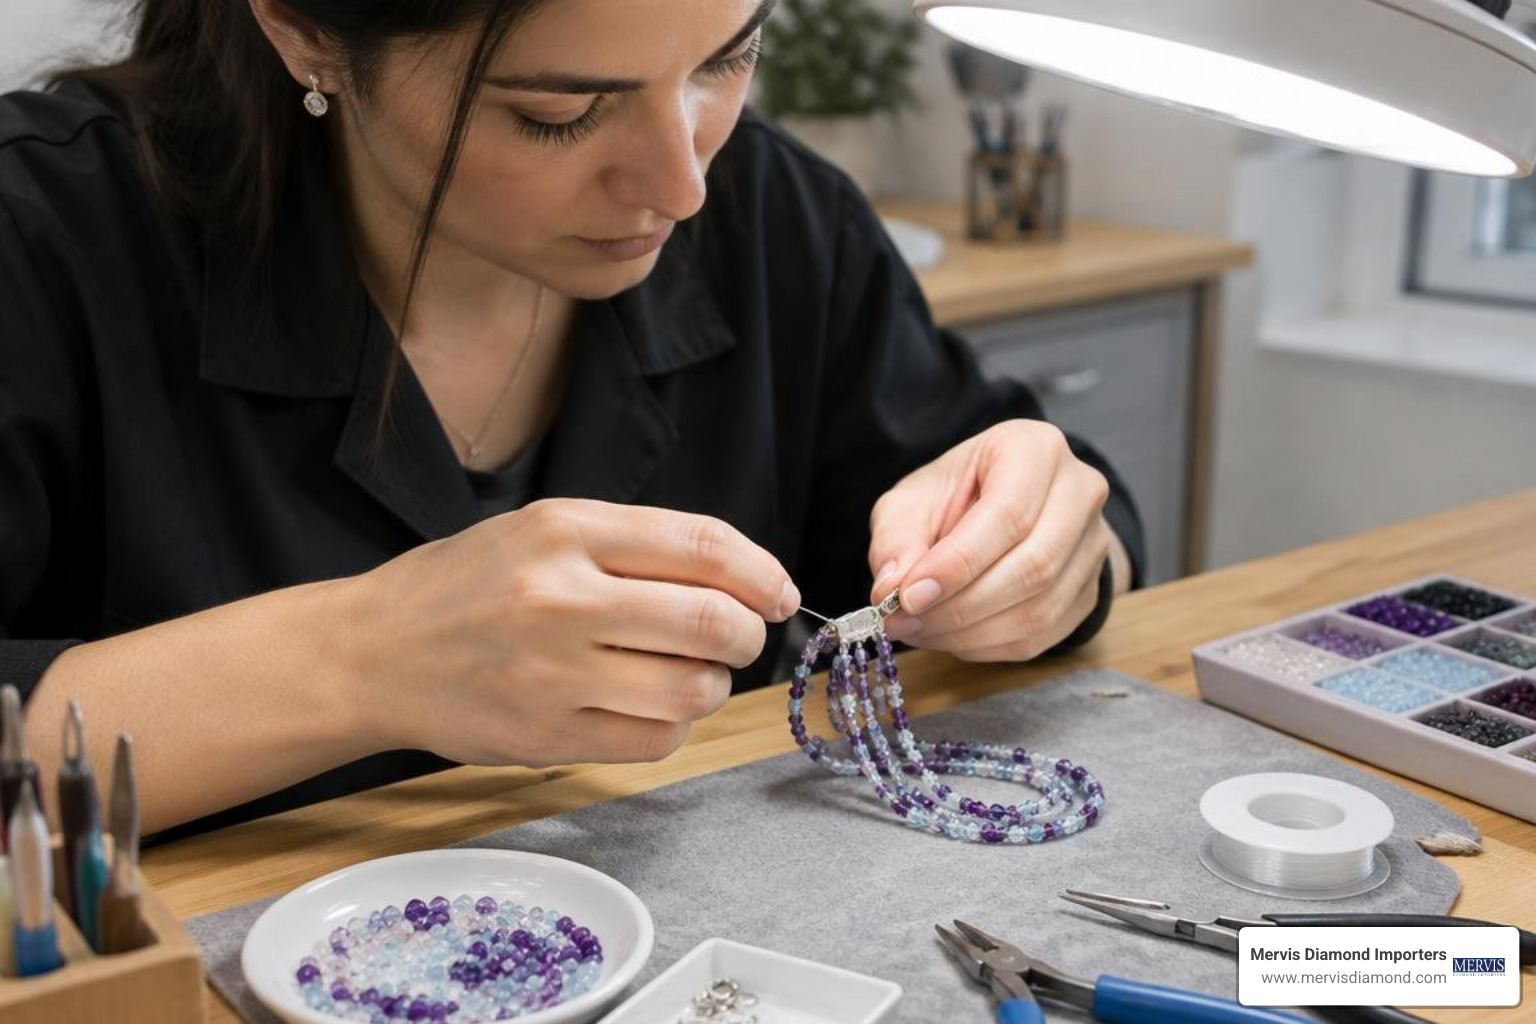
High-value gemstone strands, graduated antique pearls, multi-strand woven bracelets, and pieces featuring precious metal solder joints carry complex structural tensions. Restringing hundreds of micro-beads or knotting between fragile natural pearls requires specialized silk cord, calipers, and calibrated tensioning equipment. Entrusting valuable heirlooms to seasoned craftsmen guarantees that original aesthetic proportions and safety clasps are preserved, much like seeking expert care for fine diamond ring repair.
Professional Bead Bracelet Repair Costs and Turnaround Times
Professional restringing fees are typically structured based on material type, strand length, and the complexity of individual knots:
- Standard Elastic Restringing: Professional restringing shops generally charge between $12 and $20 per strand for basic stretch restringing.
- Wire and Cord Restringing: Restringing onto braided stainless wire with fresh crimps and clasp adjustments typically ranges from $15 to $30 for strands up to 15–20 inches.
- Specialty Surcharges: Expect a modest surcharge (often $10 to $15) for micro-beads under 4 mm or heavily knotted configurations (such as traditional pearl knotting, which often commands $1 to $2 per individually hand-tied knot).
- Turnaround Times: Local repair shops typically complete standard restringing in 3 to 7 business days, while mail-in services may require 1 to 2 weeks including insured return transit.
Long-Term Maintenance and Prevention
Extending the lifespan of your restringing work boils down to proper handling habits:
- The Roll-On Rule: Never pull, yank, or overextend an elastic bracelet over your knuckles. Gently roll the beads over the widest part of your hand onto your wrist.
- Chemical Abstinence: Remove beaded jewelry prior to showering, swimming, or applying hand lotions, perfumes, and hairsprays. Chlorine, petroleum distillates, and body oils break down synthetic elastomeric cords and dull natural stone polish.
- UV and Thermal Protection: Store beaded bracelets flat in lined jewelry trays out of direct sunlight. Ultraviolet radiation cross-links synthetic polymers, turning clear cords yellow, brittle, and prone to sudden failure.
Frequently Asked Questions About Bracelet Restringing
How Long Does a DIY Bead Bracelet Repair Usually Last?
Under regular daily wear, a properly executed elastic cord repair tied with a triple surgeon's knot lasts approximately 6 to 12 months. Synthetic cords inevitably experience environmental fatigue from atmospheric humidity, skin oils, and mechanical movement. Wire-strung bracelets with crimp closures last substantially longer, often 2 to 4 years before needing fresh wire.
Can You Use Clear Nail Polish Instead of Jeweler's Glue?
Clear nail polish is not recommended for jewelry knots. Nail lacquer dries into a hard, brittle nitrocellulose shell that cracks under the continuous flexing of an elastic cord. Once the shell fractures, it develops sharp edges that shear the cord fibers. Always use dedicated flexible jewelry adhesives like GS Hypo Cement.
Why Does Elastic Cord Keep Snapping After Restringing?
If your restringing repeatedly snaps within days or weeks, the issue is almost certainly internal bead abrasion rather than bad cord. Rough mineral drill holes act like microscopic sandpaper against the line. Run a diamond bead reamer through the internal drill holes of your beads before restringing to polish away sharp internal edges and eliminate friction points.
Conclusion
A broken beaded bracelet does not belong hidden away in a jewelry box drawer. By diagnosing the root cause of the initial break, matching cord diameter to bead hole size, and mastering the mechanical security of the triple surgeon's knot, you can restore your favorite pieces to showroom condition with lasting durability.
For cherished heirlooms, multi-strand configurations, or pieces showcasing precious stones, professional jewelers provide the specialized equipment and generational expertise required to preserve structural integrity. Explore our comprehensive master guide on how to care for fine diamond jewelry to keep every treasure in your collection shining brilliantly for years to come.